In this article we will discuss about DIY- Build Your Own Wind Generator, procedures, Benefits. Since power is required for nearly everything, from industrial production to our own human consumption, which we still take for granted in our daily lives, wind power is regarded as one of the most effective and environmentally beneficial sources of generating power. It is also among the cheapest ways to produce electricity. However, despite the aggressive drive towards this clean, green source of energy production, the mass-roll-out of wind turbines is still in its infancy, with many governments hesitant to react to this key contributor to economies of scale. As a result, chances are your neighbourhood or town is not yet powered by wind energy. Neither is your house.
Wind generators are relatively simple to instal and can save you a lot of money on your electric costs if you build your own. And that is what this post will strive to do: assist you in building your very own wind generator by gathering and assembling very common and inexpensive components.
Table of Contents
DIY- Build Your Own Wind Generator
You may generate electricity for your home directly in your own garden.
For the time being, you must bear the rising and expensive expenses of electricity and gas, both of which are unsustainable power sources and damaging carbon dioxide emitters into the Earth’s atmosphere. Did you realise, however, that owning a wind generator can enable you to save hundreds or even millions of dollars over the course of your lifetime? To emphasise this, below are three benefits of building your own generator.

- Costs – We’ve already emphasised the possibility of significant savings. Let us go over this in more detail. Most urban areas throughout the world are still not connected to this sustainable form of electricity production via a national grid, and it may be some time before they are. However, because your wind generator is not connected nationally or locally, you pay no bills.
- Environmental sustainability – The windmill is still one of the most environmentally friendly power sources. Its only source of energy is the wind, nothing else.
- aesthetically pleasing and clean – Small-scale generators, like giant turbines, continue to be a clean source of energy production. And, because your generator is essentially small, you can place it discreetly in your yard, cover it when not in use, and it won’t make much noise when it is in use.
In this article we will discuss about DIY- Build Your Own Wind Generator, procedures, Benefits.
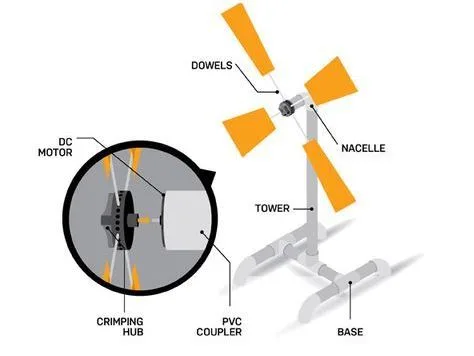
Wind Turbine Components

Any website in the universe will show you that there are numerous methods to accomplish things or develop them. However, the global principle, if you will, remains constant. Here we outline the basic components needed to create your own little wind turbine or generator for your backyard or home.
In this article we will discuss about DIY- Build Your Own Wind Generator, procedures, Benefits.
- Tools
- Building the body
- The all-important blades
- A motor
- The central hub
- Tail
- Tower
- Diode and batteries
What are the procedures?
It is entirely up to you how much electricity you choose to generate. However, for the purposes of assisting a novice, these methods get you started on generating the very minimum, but unexpectedly more power than you would have guessed possible. Furthermore, because your primary goal is to generate green energy, there will be little emphasis on or use of regular power sources. Let us start with the first step.
Seven Steps to Follow
1. Tools – You’ll start by assembling your wind generator with tools like wire strippers and soldering irons. You’ll also be employing recyclable materials for the generator, such as two-liter plastic soda bottles, their tops, light but thin strips of metal, epoxy, and glue. You’ll also need standard equipment like a saw, wrenches, and an electric drill. Your construction plan is the most crucial instrument of all.
2. Constructing the wind-catchment area – Let us now discuss the construction techniques that will be used. The wind-catchment area is the component that will actually catch the wind. The caps of the plastic bottles must be sawn off for this component (below the neck). After that, you can move on to the next stage.
3. Creating couplets – In addition to the wind-catchment area, you can start by using epoxy to attach the bottle tops together, fixing them back-to-back until you have four coupling components.
4. Building a ‘fan’ – It will not be utilised as a fan, although it will function mechanically similarly. The metal strips will be carved into an X. It should be at least one inch wide and more than a foot long. After you’ve carved out your fan, use epoxy to secure your couplets to the new fan. Allow the epoxy to set before proceeding to the next step.
5. Connecting the wind-catchment to the fan – It’s as simple as that; assuming you designed and built your couplets according to specs (from your own plan or elsewhere), all you have to do now is screw the bottle tops into the couplets.
6. The intricate matter of the generator – After you’ve assembled your fan, you’ll need to add the generator. The diodes and battery perform their duty here. Again, epoxy should be used to secure both components (generator and fan). Glue can be used to secure any exposed edges.
7. The wind generator still needs to stand somewhere – You can make a stand for this. This is also determined by the type of motor (generator) you designed and manufactured. The stand will eventually be modest, and a rectangular piece of wood can be chopped and planed to provide a base. When you’ve finished building the stand, secure the generator and fan to it. The emphasis here is on securing the apparatus in the event of severe gusts, which would ordinarily knock this light apparatus over. Weighting systems can be used to keep the generator running quickly.
In this article we will discuss about DIY- Build Your Own Wind Generator, procedures, Benefits.
Did you know that you can even use solar power here?
You might utilise solar power motors instead of batteries and diodes to power the generator, adding another sweet touch to your goal to make your home as environmentally sustainable as possible. This will also be determined by the amount of power you aim to create for your home. It is yet possible to make your home completely self-sufficient from the national grid in the near future, whether through wind, solar, or both (ideally, you will have both). For the time being, you could consider this activity to be beneficial practise.
Benefits of Having Your Own Wind Generator

We previously mentioned three major benefits at the start of this essay. However, how this small wind turbine benefits you in the long run is entirely up on you and your immediate requirements and goals. Domestically, and to round up this introduction to building a modest wind generator, here are some options to consider in the meanwhile.
In this article we will discuss about DIY- Build Your Own Wind Generator, procedures, Benefits.
- Portable use – At this point, your little turbine may not be able to power your entire home without the use of other traditional and non-sustainable energy sources. For the time being, as a lightweight, portable device, you might alter your energy use and place the generator near to where it is needed.
- Hot water geyser – The primary and most expensive itemised user of power in your home is the hot water geyser. To save money, you might connect the generator to the geyser.
- Feeding the water supply – Windmills were once used to pump water. There’s no reason you can’t do the same. The wind turbine may power your entire garden, particularly your organic produce garden.
- Focus areas – Take advantage of the device’s portability by using it as a measurement instrument to determine which region of your home (other than the geyser) consumes the most power.
We hope that this tutorial has motivated you to look for new and imaginative ways to power your home without relying on the non-sustainable grid. What it has also taught you is that there is a lot you can do with recycled materials instead of throwing them away.
Can we possible to make these things.
Yes you do it step by step…..